Pizza Informer recipe
How to Make Pizza Without an Oven
Published January 31, 2023Last updated August 7, 2026
Make crisp, fully cooked pizza in a covered skillet, then adapt the same small-pizza method for an outdoor grill, air fryer, or electric countertop appliance.
Jump to recipe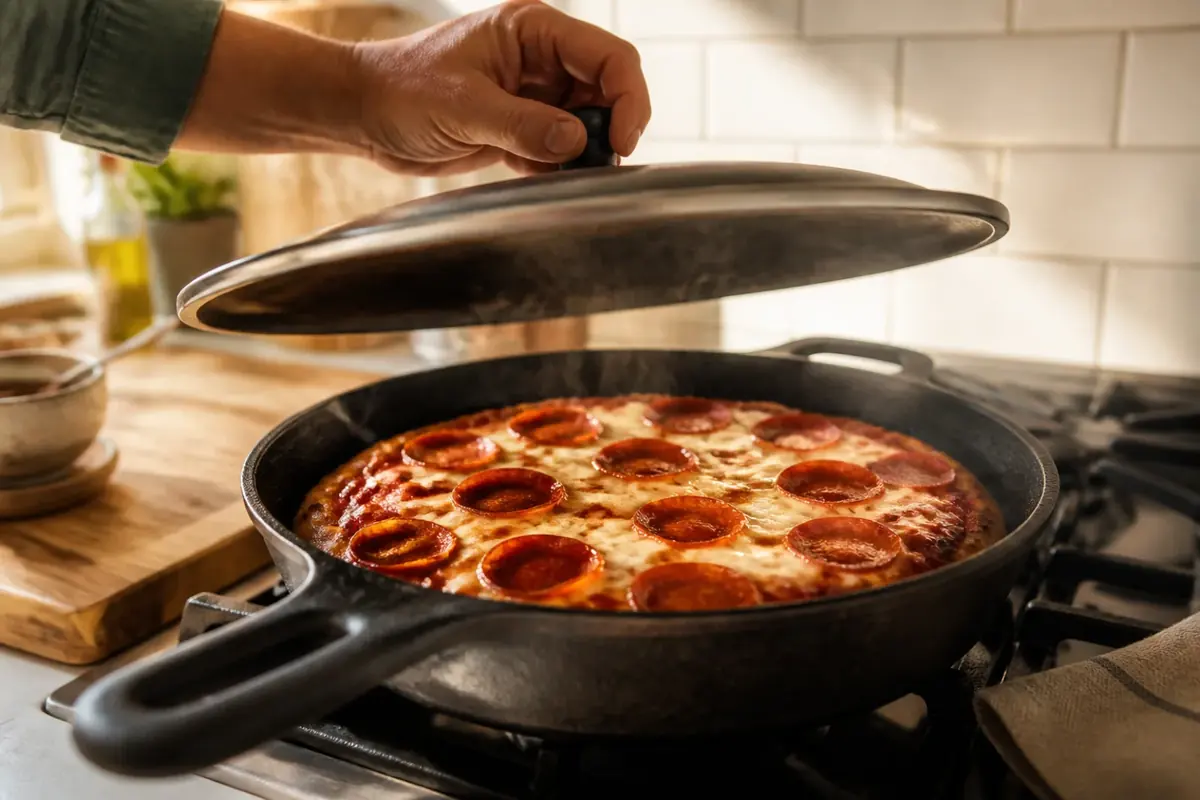
A covered skillet can produce a good small pizza without a conventional oven. The practical sequence is to cook one side of a thin dough round, flip it, add a restrained layer of sauce and cheese, then cover the pan so the toppings heat while the second side browns. It will not develop the deeply blistered rim of a very hot pizza oven, but it can deliver a crisp base, melted cheese, and a tender center using ordinary kitchen equipment.
The recipe below makes two 8-inch pizzas because small rounds are easier to turn, top, and cook evenly than one large pizza. Limiting the sauce and choosing dry, thinly sliced toppings are equally important. A heavily loaded skillet pizza may burn underneath while moisture pools on top.
Use only appliances and cookware approved for the intended cooking method. Outdoor grills and camp stoves belong outdoors, never in a home, garage, tent, or other enclosed area. Precook meat, poultry, and seafood toppings rather than expecting the short pizza-cooking time to make raw ingredients safe.
The recipe
How to Make Pizza Without an Oven
Pizza base
- 12 ounces (340 grams) room-temperature pizza dough, divided into 2 equal pieces
- 2 teaspoons olive oil, divided, plus a little for handling the dough if needed
- 2 tablespoons all-purpose flour or fine cornmeal, for shaping
Toppings
- 1/2 cup thick pizza sauce, divided
- 4 ounces (113 grams) low-moisture whole-milk or part-skim mozzarella, shredded, divided
- 2 tablespoons finely grated Parmesan, divided
- 1/2 teaspoon dried oregano or Italian seasoning
- Up to 1/2 cup total optional toppings, cooked or ready to eat, cut into small pieces
- Fresh basil, crushed red pepper, or additional Parmesan, for serving
Method
- Prepare the equipment and toppings. Set out a 10-inch heavy skillet with a fitted lid, a wide spatula, tongs, a cutting board, and a plate. Cast iron retains heat well, but a heavy stainless-steel or manufacturer-approved nonstick skillet also works. Shred the cheese and prepare every topping before heating the pan; once the dough starts cooking, the process moves quickly.
- Control topping moisture. Drain wet ingredients such as fresh mozzarella, jarred peppers, olives, artichokes, and pineapple. Pat them dry before cutting. Sauté mushrooms, zucchini, spinach, or other water-rich vegetables until their released liquid has evaporated. Use only cooked meat or poultry. Keep the combined optional toppings to about 1/4 cup per pizza so the crust can finish before the underside scorches.
- Shape the first crust. Lightly flour the work surface. Press one dough portion into a disk, then stretch it into an 8-inch round about 1/8 inch thick through the center. Leave only a narrow raised edge. If the dough contracts immediately, cover it and let it rest for 10 minutes before continuing. Brush or rub one side with 1/2 teaspoon olive oil.
- Preheat the skillet. Heat the empty skillet over medium heat for about 2 minutes. It should feel hot when you hold a hand several inches above it, but it should not smoke. Burner output and pan weight vary, so treat medium as a starting point rather than a fixed requirement. If the oil smokes when it touches the pan, remove the skillet from the heat briefly and lower the burner.
- Cook the first side. Place the dough in the skillet with the oiled side down. Adjust any folded edges immediately with tongs. Cook uncovered for 3 to 5 minutes, rotating the skillet once or twice if your burner heats unevenly. Bubbles should rise across the surface, the top should lose its raw shine, and the underside should develop scattered golden-brown spots. Lift an edge with the spatula to check rather than relying only on the timer.
- Flip and top lightly. Brush the exposed surface with another 1/2 teaspoon olive oil, then flip the crust. Immediately reduce the heat to medium-low. Spread 1/4 cup sauce over the cooked side, leaving a 1/2-inch border. Add half the mozzarella, 1 tablespoon Parmesan, half the oregano, and no more than 1/4 cup prepared optional toppings.
- Cover and finish. Cover the skillet and cook for 4 to 7 minutes. Check after 3 minutes and rotate the pan if one area is browning faster. The pizza is ready when the cheese has melted, the center of the dough looks set rather than gummy, and the underside is crisp and browned. If the crust darkens before the cheese melts, turn the burner to its lowest setting or move the covered pan completely off the heat for 1 to 2 minutes.
- Repeat with the second pizza. Transfer the first pizza to a board and let it stand for 2 minutes. Wipe loose flour or burned cheese from the skillet with a dry, heat-safe towel held in tongs; do not pour water into the hot pan. Repeat the shaping and cooking process with the remaining dough, oil, sauce, cheese, seasoning, and toppings.
- Slice and serve. Finish with basil, crushed red pepper, or additional Parmesan. Cut each pizza into four wedges. A wheel cutter works, but a chef’s knife or kitchen shears may be easier on a small, crisp skillet crust.
Equipment for stovetop pizza
A fitted lid is as important as the skillet. The covered pan traps enough heat to melt the cheese and finish the top of the dough while the burner cooks the bottom. A glass lid makes progress easier to monitor, but any properly fitting heat-safe lid is suitable.
Do not place a skillet under an unapproved flame, cover the burner with foil, or build a makeshift enclosure around the pan. Use cookware that sits securely on the burner and follow the range and cookware manufacturers’ instructions. Pan handles and lids become hot, so keep dry potholders nearby.
- 10-inch heavy skillet with a fitted lid
- Wide heat-safe spatula and tongs
- Cutting board and pizza wheel, chef’s knife, or kitchen shears
- Dry potholders or oven mitts
- Food thermometer when preparing or reheating meat toppings
Why small, thin pizzas work best
A stovetop supplies intense heat from below but little direct heat from above. Thin dough shortens the time needed to cook the center, while the lid holds warm air around the cheese. An 8-inch round also leaves enough space in a 10-inch skillet to slide in a spatula and inspect the underside.
Thick dough can remain gummy near the center even after the bottom has browned. If you prefer a thicker crust, use lower heat and allow extra covered cooking time, but expect a softer, more breadlike result. Dividing the dough into two pizzas is more dependable than forcing the full amount into one pan.
- Stretch the center to about 1/8 inch thick.
- Leave a narrow rim rather than a large, puffy border.
- Use thick sauce that will not run toward the edge.
- Limit cheese and toppings to prevent a cold, wet center.
Outdoor grill method
A grill can cook the crust from below while its closed lid surrounds the toppings with heat. Use the grill outdoors in a well-ventilated location and follow its instructions for lighting, clearances, fuel, and shutdown. The U.S. Consumer Product Safety Commission warns against using gas or charcoal grills indoors or in enclosed areas because of carbon-monoxide and fire hazards.
Preheat the grill for two-zone cooking, with one hotter area and one cooler area. A grill thermometer reading near 400°F to 450°F provides a useful starting range, although grate temperature and lid thermometers do not always match. Clean and lightly oil the grates according to the grill manufacturer’s directions.
Stretch each dough portion to about 8 inches and brush both sides lightly with oil. Place it over direct medium heat for 2 to 3 minutes, until the underside has grill marks and the top begins to bubble. Flip it, move it to the cooler zone, add the measured toppings, and close the lid. Cook for another 3 to 6 minutes, checking often, until the cheese melts and the crust is browned. Move the pizza farther from the heat if the bottom colors too quickly.
- Carry the shaped dough, toppings, utensils, and serving board outside before cooking.
- Use long tongs and a wide spatula; do not reach over flare-ups.
- Keep raw meat and its utensils separate from cooked pizza.
- Never bring a still-hot charcoal grill or live coals into a building, vehicle, or tent.
Air-fryer method
Air-fryer baskets and trays differ considerably in usable area, airflow, heating-element position, and maximum temperature. Measure the flat cooking surface before shaping the dough and leave clearance for air circulation. Consult the appliance manual before using oil, foil, parchment, a pan, or other accessories.
For a typical basket-style machine, begin around 375°F. Shape one dough portion so it lies flat without curling up the basket walls. Lightly oil it and cook without toppings for about 3 minutes, or until the surface begins to set. Flip the crust, add a thin layer of sauce and cheese, then cook for another 4 to 6 minutes. Check early because a strong fan can brown cheese rapidly.
Secure light ingredients beneath the cheese, and do not add loose herbs until after cooking. If the appliance fan lifts pepperoni edges or scatters shredded cheese, reduce the topping quantity or use thin slices of mozzarella. Never run the machine with an unsecured sheet of parchment, because circulating air may lift it toward the heating element.
- Make one pizza at a time unless the appliance manual supports multiple levels.
- Keep dough and toppings clear of the heating element.
- Preheat only if the manufacturer recommends it.
- Use visual cues because cooking times vary substantially among machines.
Electric skillet and countertop-appliance options
An electric skillet with a fitted lid follows the main recipe closely. Set it near 375°F for the first side, then reduce it to roughly 300°F to 325°F after flipping and topping. The thermostat cycles on and off, so inspect the crust rather than treating the dial as a precise surface-temperature reading.
A covered griddle, multicooker with an approved sauté function, or other countertop cooker may also work if its manual permits dry or lightly oiled cooking. The dough must sit on a stable cooking surface, and the lid must close without touching the toppings. Do not adapt the recipe to an appliance that prohibits empty preheating, oil, or the required cookware.
For a toaster oven or countertop convection oven, follow the manufacturer’s pizza instructions and temperature limit. Shape the dough to fit an approved tray with clearance from the walls and heating elements. These appliances behave more like compact ovens than skillets, so a manufacturer-specific method is more reliable than stovetop timing.
- Confirm that the cooking vessel, lid, tray, and accessories are approved for the appliance.
- Keep vents uncovered and maintain the required clearance around the appliance.
- Do not leave the appliance unattended while cheese, oil, or parchment is near a heating element.
- Unplug portable electric appliances after cooking and allow them to cool before cleaning.
Topping substitutions and combinations
Low-moisture mozzarella melts predictably and contributes less water than cheese packed in brine. Provolone, Monterey Jack, fontina, or a labeled plant-based pizza cheese can replace part or all of it, although browning and melting behavior will vary. Fresh mozzarella can work when it is sliced thinly, drained thoroughly, and used sparingly.
A thick homemade pizza sauce is suitable, but watery sauce should be simmered until it coats a spoon. Pesto may be used in a thinner layer because its oil can make the surface greasy. For a white pizza, replace the tomato sauce on each crust with 2 tablespoons of ricotta mixed with a teaspoon of olive oil; keep the remaining toppings especially light.
Good low-moisture combinations include pepperoni with sliced olives, cooked mushrooms with roasted peppers, or thinly sliced cooked sausage with sautéed onions. For a simple cheese pizza, omit the optional toppings and increase neither the sauce nor the cheese—the restrained quantities help the crust stay crisp.
- Gluten-free dough: use a dough or ready-made crust labeled for skillet or stovetop cooking, since handling and hydration vary by formulation.
- Dairy-free pizza: choose a dairy-free dough and use a plant-based cheese or skip the cheese in favor of cooked vegetables and a drizzle of olive oil.
- Whole-wheat dough: stretch it thin and allow a short rest if it resists shaping.
- No pizza sauce: use crushed tomatoes drained in a sieve and seasoned with salt, oregano, and a little olive oil.
Food-safety notes
The short, covered cooking time is not dependable for raw sausage, ground beef, chicken, bacon, or seafood. Cook animal-protein toppings separately, check them with a food thermometer, and add them to the pizza only after they have reached the applicable safe temperature. USDA guidance lists 160°F for ground meats, 165°F for poultry, and 145°F for fish and shellfish. Color alone is not a reliable safety check.
Prevent cooked ingredients and ready-to-eat cheese from contacting plates, cutting boards, or utensils that held raw meat. Wash hands and surfaces after handling raw ingredients. These precautions matter even when the meat will receive a few additional minutes of heat on the pizza.
- Precook raw animal toppings before assembling the pizza.
- Use a food thermometer rather than judging meat by color.
- Keep raw ingredients separate from sauce, cheese, and garnishes.
- Follow package directions for processed meats that require cooking.
Storage and reheating
Refrigerate leftover pizza within 2 hours of cooking, or within 1 hour when the surrounding temperature is above 90°F. Place slices in a shallow covered container or wrap them once they have stopped steaming heavily. FoodSafety.gov lists pizza for 3 to 4 days in a refrigerator maintained at 40°F or below.
For a crisp base, reheat slices in a covered skillet over low heat for 4 to 7 minutes. Check the bottom after 3 minutes and remove the lid for the final minute if trapped moisture has softened the crust. Leftovers containing meat should reach 165°F when reheated.
Pizza can be frozen for longer storage. Separate cooled slices with freezer paper and seal them in a freezer-safe container. Thaw overnight in the refrigerator or reheat from frozen over very low heat, allowing additional time for the center to become hot.
- Refrigerator: 3 to 4 days at 40°F or below.
- Freezer: FoodSafety.gov lists 1 to 2 months as a quality guideline for pizza.
- Skillet reheating: low heat, covered, 4 to 7 minutes.
- Reheat leftovers containing meat to 165°F.
Recipe questions
Questions about this recipe
Can I put uncooked pizza dough directly in a skillet?
Yes, provided the dough is stretched thin and the pan temperature is controlled. Cook the first side before adding toppings, then flip, top, and cover. Putting sauce on completely raw dough at the start makes the center harder to cook before the bottom burns.
Why is my stovetop pizza burned underneath but raw in the middle?
The burner is too hot, the dough is too thick, or the toppings are too heavy. Lower the heat, shape an 8-inch crust with a center about 1/8 inch thick, and limit each pizza to 1/4 cup sauce, 2 ounces cheese, and no more than 1/4 cup optional toppings.
How can I melt the cheese without burning the crust?
Reduce the burner to medium-low immediately after flipping the crust and cover the skillet. If the bottom is already brown, turn the heat to its lowest setting or move the covered pan off the burner for 1 to 2 minutes. Residual heat will continue softening the cheese.
Can I make skillet pizza without a lid?
A lid gives the most even result. If none fits, use an inverted heat-safe skillet or a manufacturer-approved metal cover that fully spans the pan and remains stable. Do not use plastic, a plate that is not rated for direct cooking heat, or a cover that can slide onto the burner.
Should I use parchment paper in a skillet or air fryer?
It is unnecessary in a skillet and may reduce browning. In an air fryer, use parchment only when the appliance manufacturer permits it, and keep it fully weighted by food. An unsecured sheet can lift in the airflow and contact the heating element.
Can frozen pizza be cooked on the stovetop?
It may be possible, but the result depends on the pizza’s thickness and the package instructions. A frozen pizza formulated only for oven baking may scorch underneath before the center heats through. Use a stovetop method only if the manufacturer provides one; otherwise, thawing does not automatically make an unsupported cooking method safe or effective.
Sources and further reading